
54. TensorFlow 高阶 API 使用#
54.1. 介绍#
TensorFlow 作为深度学习框架,当然是为了帮助我们更便捷地构建神经网络。所以,本次实验将会了解如何使用 TensorFlow 来构建神经网络,并学会 TensorFlow 构建神经网络的重要函数和方法。
54.2. 知识点#
Keras 顺序模型
Keras 函数模型
Keras 模型存储及推理
Estimator 高阶 API
54.3. tf.keras 模块介绍#
Keras 本来是一个用 Python 编写的独立高阶神经网络 API,它能够以 TensorFlow, CNTK,或者 Theano 作为后端运行。目前,TensorFlow 已经吸纳 Keras,并组成了 tf.keras 模块 🔗。官方介绍,tf.keras 和单独安装的 Keras 略有不同,但考虑到未来的发展趋势,实验以学习 tf.keras 为主。

通过查阅官方文档,你可以发现 tf.keras 🔗 下又包含 10 多个子模块,而这些子模块下又集成了大量的类和函数。由于 Keras 先前是独立发布的,实际上我们在仅使用 tf.keras 的情况下,就几乎能够满足深度神经网络搭建的全部需求。
下面,我们对 Keras 进行快速上手介绍。Keras 的核心数据结构是 Model,一种组织网络层的方式。其中有两种模式,最简单且最常用的模型是 Sequential 顺序模型,它是由多个网络层线性堆叠的栈。对于更复杂的结构,可以使用 Keras 函数式 API,它允许构建任意的神经网络图。
54.4. Keras 顺序模型#
使用 Keras 创建一个 Sequential 顺序模型非常简单,只需要 1 行代码 tf.keras.models.Sequential() 🔗 就可以搞定。
import tensorflow as tf
import warnings

warnings.filterwarnings("ignore")

model = tf.keras.models.Sequential()  # 定义顺序模型
model
<keras.src.engine.sequential.Sequential at 0x1412695d0>
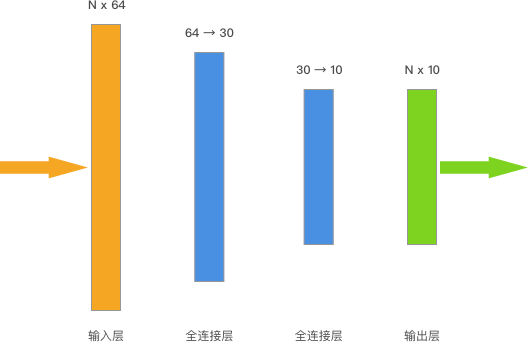
当然,上面这行代码肯定还不是一个神经网络模型,只有向其中添加不同结构的神经网络层,才能真正成为一个我们需要的神经网络模型。这里我们选择前面实验已经构建过的简单全连接神经网络。
Keras 中的神经网络层全部位于 tf.keras.layers 🔗 下方。这里包含了各自经典神经网络所需的功能层,例如我们这里需要的全连接层 tf.keras.layers.Dense。
Dense(units, activation=None, use_bias=True, kernel_initializer='glorot_uniform', bias_initializer='zeros', kernel_regularizer=None, bias_regularizer=None, activity_regularizer=None, kernel_constraint=None, bias_constraint=None)
units: 正整数,输出空间维度。
activation: 激活函数。若不指定,则不使用激活函数(即, 线性激活:
a(x) = x)。use_bias: 布尔值,该层是否使用偏置项量。
kernel_initializer:
kernel权值矩阵的初始化器。bias_initializer: 偏置项量的初始化器.
kernel_regularizer: 运用到
kernel权值矩阵的正则化函数。bias_regularizer: 运用到偏置项的正则化函数。
activity_regularizer: 运用到层的输出的正则化函数。
kernel_constraint: 运用到
kernel权值矩阵的约束函数。bias_constraint: 运用到偏置项量的约束函数。
Dense 实现操作: output = activation(dot(input, kernel) + bias) 其中 activation 是按逐个元素计算的激活函数,kernel 是由网络层创建的权值矩阵,以及 bias 是其创建的偏置项量 (只在 use_bias 为 True 时才有用)。通过参数你就会发现,这是一个封装了很多功能的高阶 API。
下面,我们就向上面定义好的顺序模型 model 中添加 2 个全连接层。
# 添加全连接层
model.add(tf.keras.layers.Dense(units=30, activation=tf.nn.relu))  # 输出 30,relu 激活
model.add(tf.keras.layers.Dense(units=10, activation=tf.nn.softmax))  # 输出 10,softmax 激活
你可以发现,一开始我们定义顺序模型就像是「打地基」,而只需要使用 add 就可以「盖楼房」了。上面的代码中,激活函数 tf.nn.relu 也可以用名称 'relu' 代替,即可写作 tf.keras.layers.Dense(units=30, activation='relu'),具体参考 🔗。
添加完神经网络层之后,就可以使用 model.compile 🔗 来编译顺序模型。这时,需要通过参数指定优化器,损失函数,以及评估方法。
# adam 优化器 + 交叉熵损失 + 准确度评估
model.compile(
    optimizer="adam", loss="sparse_categorical_crossentropy", metrics=["accuracy"]
)
其中,参数可以使用如上所示的名称或者 TensorFlow 实例。如果使用实例的优化器和损失函数,需要从 TensorFlow 支持的 全部优化器列表 和 全部损失函数列表 中选择。如果使用名称,需要从 Keras 支持的 名称列表 中选择。
特别注意的是,这里的损失函数是不能胡乱选的。你需要根据网络的输出形状和真实值的形状来决定。如果不匹配就会报错。由于实验示例网络最后通过了 tf.nn.softmax 激活,那么对于单个样本输入最终就会得到一个概率最大的整数类型的输出。此时就选择了 sparse_categorical_crossentropy 具有整数输出类型的交叉熵损失函数。随着实验后续深入,见的越多就会有使用经验了。
接下来,我们定义数据,同样选择 DIGITS 数据集。
from sklearn.model_selection import train_test_split
from sklearn.datasets import load_digits
import numpy as np

# 准备 DIGITS 数据
digits = load_digits()
X_train, X_test, y_train, y_test = train_test_split(
    digits.data, digits.target, test_size=0.2, random_state=1
)

X_train.shape, X_test.shape, y_train.shape, y_test.shape
((1437, 64), (360, 64), (1437,), (360,))
这里无需像前面的实验对目标值进行独热编码,原因在于上面定义的网络最终输出本身就是样本类别整数。
定义完数据之后,使用 model.fit 🔗 就可以开始模型训练了。这个过程和使用 scikit-learn 训练模型一样直观。我们需要指定小批量 batch_size 大小,和全数据迭代次数 epochs 参数。
# 模型训练
model.fit(X_train, y_train, batch_size=64, epochs=5)
Epoch 1/5
23/23 [==============================] - 0s 610us/step - loss: 6.4905 - accuracy: 0.1176
Epoch 2/5
23/23 [==============================] - 0s 544us/step - loss: 3.1685 - accuracy: 0.2436
Epoch 3/5
23/23 [==============================] - 0s 641us/step - loss: 1.8032 - accuracy: 0.4774
Epoch 4/5
23/23 [==============================] - 0s 680us/step - loss: 1.2326 - accuracy: 0.6451
Epoch 5/5
23/23 [==============================] - 0s 583us/step - loss: 0.9109 - accuracy: 0.7363
<keras.src.callbacks.History at 0x2a4423760>
你可以看到每一个 Epoch 之后模型在训练数据上的损失和分类准确度。使用 model.evaluate 即可评估训练后模型在测试集上的损失和分类准确度。
# 模型评估
model.evaluate(X_test, y_test)
12/12 [==============================] - 0s 520us/step - loss: 0.8579 - accuracy: 0.7472
[0.8579378724098206, 0.7472222447395325]
实际使用过程中,我们一般会直接将测试数据通过 validation_data 参数传入训练过程。那么,每一个 Epoch 之后都会同时输出在训练集和测试集上的分类评估结果。
# 使用参数传入测试数据
model.fit(X_train, y_train, batch_size=64, epochs=5, validation_data=(X_test, y_test))
Epoch 1/5
23/23 [==============================] - 0s 2ms/step - loss: 0.7071 - accuracy: 0.7850 - val_loss: 0.6989 - val_accuracy: 0.8139
Epoch 2/5
23/23 [==============================] - 0s 1ms/step - loss: 0.5634 - accuracy: 0.8413 - val_loss: 0.5742 - val_accuracy: 0.8417
Epoch 3/5
23/23 [==============================] - 0s 1ms/step - loss: 0.4699 - accuracy: 0.8692 - val_loss: 0.4948 - val_accuracy: 0.8611
Epoch 4/5
23/23 [==============================] - 0s 1ms/step - loss: 0.3998 - accuracy: 0.8852 - val_loss: 0.4493 - val_accuracy: 0.8722
Epoch 5/5
23/23 [==============================] - 0s 999us/step - loss: 0.3482 - accuracy: 0.8991 - val_loss: 0.4052 - val_accuracy: 0.8972
<keras.src.callbacks.History at 0x2a4d7f3a0>
可以看到,区别于前面实验中较为复杂的模型定义过程,使用 Keras 提供的顺序模型只需要数行左右的代码即可完成。除此之外,你不需要初始化权重,编写前向计算图,设计 Mini Batch 机制,自定义评估方法和过程等。基本上把搭建神经网络中复杂的过程都省略了,只留下了直观的构建方法。这也就是 Keras 深受喜欢的原因,也是 TensorFlow 将 Keras 纳入的原因。
前面虽然我们仅使用了少数几个方法,但是你会发现每个方法涉及到的参数都非常多。这些参数可以帮助开发者在高阶 API 上进一步实现高度自定义过程。对于初学者而言,不要想一次性全部了解,随着后续对深度学习的逐渐深入,慢慢的都会熟悉起来。实际情况中,就算熟悉的开发者也不可能记得住每个 API 及参数,很多时候都是需要使用时才查阅官方文档。退一步讲,由于 TensorFlow API 变化更新的速度非常快,就算这次记住了,下次说不定还是需要查阅官方文档。
54.5. Keras 函数模型#
除了顺序模型,Keras 也提供函数式 API。和顺序模型最大的不同在于,函数模型可以通过多输入多输出的方式。并且所有的模型都是可调用的,就像层一样利用函数式模型的接口,我们可以很容易的重用已经训练好的模型。
下面,我们通过函数式 API 来重写上面的模型结构。
inputs = tf.keras.Input(shape=(64,))  # 输入层
x = tf.keras.layers.Dense(units=30, activation="relu")(inputs)  # 中间层
outputs = tf.keras.layers.Dense(units=10, activation="softmax")(x)  # 输出层

# 函数式 API 需要指定输入和输出
model = tf.keras.Model(inputs=inputs, outputs=outputs)
model
<keras.src.engine.functional.Functional at 0x2a58483d0>
模型编译和训练和顺序模型基本一致。
model.compile(
    optimizer="adam", loss="sparse_categorical_crossentropy", metrics=["accuracy"]
)

model.fit(X_train, y_train, batch_size=64, epochs=20, validation_data=(X_test, y_test))
Epoch 1/20
23/23 [==============================] - 0s 3ms/step - loss: 6.9277 - accuracy: 0.2143 - val_loss: 3.8674 - val_accuracy: 0.3361
Epoch 2/20
23/23 [==============================] - 0s 1ms/step - loss: 2.8077 - accuracy: 0.3925 - val_loss: 1.8169 - val_accuracy: 0.5278
Epoch 3/20
23/23 [==============================] - 0s 1ms/step - loss: 1.4311 - accuracy: 0.6026 - val_loss: 1.0242 - val_accuracy: 0.7028
Epoch 4/20
23/23 [==============================] - 0s 1ms/step - loss: 0.9445 - accuracy: 0.7307 - val_loss: 0.7485 - val_accuracy: 0.7583
Epoch 5/20
23/23 [==============================] - 0s 1ms/step - loss: 0.7112 - accuracy: 0.7996 - val_loss: 0.5753 - val_accuracy: 0.8306
Epoch 6/20
23/23 [==============================] - 0s 1ms/step - loss: 0.5763 - accuracy: 0.8365 - val_loss: 0.4773 - val_accuracy: 0.8583
Epoch 7/20
23/23 [==============================] - 0s 1ms/step - loss: 0.4701 - accuracy: 0.8622 - val_loss: 0.4051 - val_accuracy: 0.8750
Epoch 8/20
23/23 [==============================] - 0s 1ms/step - loss: 0.4065 - accuracy: 0.8789 - val_loss: 0.3500 - val_accuracy: 0.8833
Epoch 9/20
23/23 [==============================] - 0s 1ms/step - loss: 0.3492 - accuracy: 0.8956 - val_loss: 0.3056 - val_accuracy: 0.9083
Epoch 10/20
23/23 [==============================] - 0s 1ms/step - loss: 0.3058 - accuracy: 0.9054 - val_loss: 0.2715 - val_accuracy: 0.9222
Epoch 11/20
23/23 [==============================] - 0s 987us/step - loss: 0.2672 - accuracy: 0.9207 - val_loss: 0.2475 - val_accuracy: 0.9167
Epoch 12/20
23/23 [==============================] - 0s 996us/step - loss: 0.2427 - accuracy: 0.9276 - val_loss: 0.2355 - val_accuracy: 0.9194
Epoch 13/20
23/23 [==============================] - 0s 1ms/step - loss: 0.2203 - accuracy: 0.9332 - val_loss: 0.2141 - val_accuracy: 0.9194
Epoch 14/20
23/23 [==============================] - 0s 986us/step - loss: 0.2044 - accuracy: 0.9367 - val_loss: 0.2031 - val_accuracy: 0.9250
Epoch 15/20
23/23 [==============================] - 0s 1ms/step - loss: 0.1820 - accuracy: 0.9478 - val_loss: 0.1872 - val_accuracy: 0.9222
Epoch 16/20
23/23 [==============================] - 0s 938us/step - loss: 0.1683 - accuracy: 0.9450 - val_loss: 0.1780 - val_accuracy: 0.9250
Epoch 17/20
23/23 [==============================] - 0s 1ms/step - loss: 0.1557 - accuracy: 0.9555 - val_loss: 0.1729 - val_accuracy: 0.9306
Epoch 18/20
23/23 [==============================] - 0s 1ms/step - loss: 0.1441 - accuracy: 0.9569 - val_loss: 0.1639 - val_accuracy: 0.9417
Epoch 19/20
23/23 [==============================] - 0s 1ms/step - loss: 0.1340 - accuracy: 0.9610 - val_loss: 0.1577 - val_accuracy: 0.9389
Epoch 20/20
23/23 [==============================] - 0s 1ms/step - loss: 0.1269 - accuracy: 0.9659 - val_loss: 0.1491 - val_accuracy: 0.9444
<keras.src.callbacks.History at 0x2a584b550>
通过上面的示例,相信你已经看出了顺序模型和函数式模型的区别。函数式模型看起来更符合建模流出,有清晰的输入和输出,灵活性也更好一些。实际上对于二者,主要是看个人使用习惯,初学者可以根据自己的偏好自由选择。
54.6. Keras 模型存储及推理#
使用 Keras 训练完成的模型可以非常方便地保存下来,保存模型的目的主要有 2 个:
对于较大的训练任务,保存模型可以方便后续恢复重新使用。
保存后的模型可以方便模型部署。
TensorFlow 模型一般包含 3 类要素,分别是:模型权重值、模型配置乃至优化器配置。
如果只需要保存模型权重值,可以使用 tf.keras.Model.save_weights 🔗,并指定存放路径。
model.save_weights("./weights/model") # 保存检查点名称为 model,路径为 ./weights
!ls './weights/' # 直接运行查看目录下文件
checkpoint model.data-00000-of-00001 model.index
model.load_weights("./weights/model") # 恢复检查点
<tensorflow.python.checkpoint.checkpoint.CheckpointLoadStatus at 0x10673b6d0>
默认情况下,该方法会以 TensorFlow 检查点文件格式 🔗 保存模型的权重。检查点文件是 TensorFlow 特有的模型权重保存方法,其默认会以每 10 分钟(600 秒)写入一个检查点,训练时间较短则只保存一个检查点。检查点默认情况下只保存 5 个,即模型训练过程中不同时间点的版本状态。
我们一般会在大型任务训练时设置检查点保存。这样做的好处在于一旦因为意外情况导致训练终止,TensorFlow 可以加载检查点状态,避免又需要从头开始训练。
如果我们需要模型推理,一般情况会使用 model.save 保存完整的模型,即包含模型权重值、模型配置乃至优化器配置等。例如,下面将模型存为 Keras HDF5 格式,其为 Keras 多后端实现的默认格式。
model.save("model.h5") # 保存完整模型
接下来,可以使用 tf.keras.models.load_model 重载模型。
model_ = tf.keras.models.load_model("model.h5") # 调用模型
model.summary() 可以用来查看 Keras 模型结构,包含神经网络层和参数等详细数据。
model_.summary()
Model: "model"
_________________________________________________________________
 Layer (type)                Output Shape              Param #
=================================================================
 input_1 (InputLayer)        [(None, 64)]              0

 dense_2 (Dense)             (None, 30)                1950

 dense_3 (Dense)             (None, 10)                310

=================================================================
Total params: 2260 (8.83 KB)
Trainable params: 2260 (8.83 KB)
Non-trainable params: 0 (0.00 Byte)
_________________________________________________________________
然后,使用 predict 方法就可以完成模型推理了。
preds = model_.predict(X_test[:3])  # 预测前 3 个测试样本
preds
1/1 [==============================] - 0s 149ms/step
array([[4.73537875e-06, 9.17093933e-01, 4.64934768e-04, 2.65565213e-05,
        2.28360551e-03, 3.85231651e-05, 4.47081402e-03, 9.71576490e-04,
        7.46408477e-02, 4.48814944e-06],
       [1.64942004e-10, 2.32878183e-09, 5.78561583e-07, 2.30714594e-08,
        8.31453795e-11, 9.99986291e-01, 6.51977983e-09, 1.30634835e-05,
        3.22499787e-08, 5.17414334e-09],
       [9.99606788e-01, 6.16279285e-05, 2.53702492e-05, 1.37913734e-08,
        1.90027888e-04, 5.15496940e-05, 5.33620005e-05, 8.60737828e-08,
        1.32346440e-06, 9.78428307e-06]], dtype=float32)
预测结果为神经网络通过 Softmax 激活后的输出值。所以我们通过 NumPy 找出每个样本输出最大概率及其对应的索引,其索引也就是最终的预测目标了。同样,可以输出测试数据真实标签进行对比。
np.argmax(preds, axis=1), np.max(preds, axis=1) # 找出每个样本预测概率最大值索引及其概率
(array([1, 5, 0]), array([0.91709393, 0.9999863 , 0.9996068 ], dtype=float32))
y_test[:3] # 直接运行查看前 3 个测试样本真实标签
array([1, 5, 0])
一般情况下,模型的预测是正确的。如果错误可以检查上方模型的评估情况,合理增大 Epoch 以提高模型准确度。
54.7. Estimator 高阶 API#
上面已经对使用 tf.keras 构建神经网络进行了学习。当然,随着后续学习的深入会逐步介绍更多用途的神经网络层,以及更丰富的用法。本小节中,我们会对 TensorFlow 另一个非常重要的组件 Estimator 进行介绍。
Estimator 是 TensorFlow 中的高阶 API,它可以将模型的训练、预测、评估、导出等操作封装在一起,构成一个 Estimator。TensorFlow 也提供了大量的预创建 Estimator 🔗,例如线性回归,提升树分类器,深度神经网络分类器等。接下来,我们就利用 TensorFlow 提供的预创建的 tf.estimator.DNNClassifier 🔗 全连接深度神经网络来完成对示例数据的学习。
使用预创建的 Estimator 编写 TensorFlow 程序,大致需要执行下列几个步骤:🔗
创建一个或多个输入函数。
定义模型的特征列。
实例化 Estimator,指定特征列和各种超参数。
在 Estimator 对象上调用一个或多个方法,传递适当的输入函数作为数据的来源。
下面,我们就按 4 个步骤来完成。首先,输入到 Estimator 的训练、评估和预测的数据都必须要通过创建输入函数来完成。
输入函数是返回 tf.data.Dataset 🔗 对象的函数,此对象会输出下列含有两个元素的元组:
features- Python 字典,其中:每个键都是特征的名称。
每个值都是包含此特征所有值的数组。
label- 包含每个样本的标签值的数组。
所以下面我们将原来的 NumPy 数组转换为 Pandas 提供的 DataFrame,这样就可以将方便将数据转换输入函数要求的 Python 字典类型。
import pandas as pd

# NumPy 数组转换为 DataFrame,并将特征列名处理成字符串类型
X_train_ = pd.DataFrame(X_train, columns=[str(i) for i in range(64)])
y_train_ = pd.DataFrame(y_train, columns=["class"])  # 标签列名
X_test_ = pd.DataFrame(X_test, columns=[str(i) for i in range(64)])
y_test_ = pd.DataFrame(y_test, columns=["class"])
此时,如果你就可以直接将 DataFrame 处理成字典类型了,列名为键,数据为值。
dict(X_train_).keys() # 运行使用 dict 将数据处理成输入函数要求的字典类型
dict_keys(['0', '1', '2', '3', '4', '5', '6', '7', '8', '9', '10', '11', '12', '13', '14', '15', '16', '17', '18', '19', '20', '21', '22', '23', '24', '25', '26', '27', '28', '29', '30', '31', '32', '33', '34', '35', '36', '37', '38', '39', '40', '41', '42', '43', '44', '45', '46', '47', '48', '49', '50', '51', '52', '53', '54', '55', '56', '57', '58', '59', '60', '61', '62', '63'])
我们直接开始定义数据输入函数 input_fn。tf.data.Dataset 🔗 对象是 TensorFlow 强烈推荐使用的数据管道。当数据为 Dataset 时,你就可以使用 TensorFlow 提供的一系列方法对数据进行变换,例如打乱采样,重复扩展,小批量输入等。
def input_fn(features, labels, batch_size):
    """数据输入函数"""
    # 将数据转换为 Dataset 对象
    dataset = tf.data.Dataset.from_tensor_slices((dict(features), labels))
    # 将数据重复及处理成小批量
    dataset = dataset.repeat().batch(batch_size)
    return dataset
上面的代码中,tf.data.Dataset.from_tensor_slices 函数创建一个代表数组切片的 tf.data.Dataset。系统会在第一个维度内对该数组进行切片。然后 dataset 执行了 repeat 重复序列操作,这样做得目的是保证后续能迭代更多次,否则当数据一遍轮完之后训练就终止了。repeat() 代表无限扩展,即到我们设定的迭代次数。repeat(5) 则表示重复序列 5 次,样本数据变为原来的 5 倍。接着,我们使用了 batch 每次从数据中取出 batch_size 的小批量进行迭代。
这样,创建数据输入函数就大功告成了。接下来,完成第二步:定义模型的特征列。
特征列是原始数据和 Estimator 之间的媒介,定义特征列就是告诉 Estimator 哪些是特征,每个特征的数据有什么特点。定义特征列并不是说指定几个字符串那样简单,我们需要利用 TensorFlow 提供的方法创建 Estimator 能够识别的特征列。
下面,我们将特征 DataFrame 的列名取出来,并使用 tf.feature_column.numeric_column 🔗 将其转换为特征列。该方法即告诉 Estimator 特征是 Numeric 数值类型。更多类型的特征列可以参考官方文档 🔗。
feature_columns = []
for key in X_train_.keys():  # 取出 DataFrame 列名
    feature_columns.append(tf.feature_column.numeric_column(key=key))  # 创建数值特征列

feature_columns[:3]  # 查看前 3 个特征列
WARNING:tensorflow:From /var/folders/tc/9kxpg1x95sl6cm2lc2jwpgt80000gn/T/ipykernel_76374/1932890431.py:3: numeric_column (from tensorflow.python.feature_column.feature_column_v2) is deprecated and will be removed in a future version.
Instructions for updating:
Use Keras preprocessing layers instead, either directly or via the `tf.keras.utils.FeatureSpace` utility. Each of `tf.feature_column.*` has a functional equivalent in `tf.keras.layers` for feature preprocessing when training a Keras model.
[NumericColumn(key='0', shape=(1,), default_value=None, dtype=tf.float32, normalizer_fn=None),
 NumericColumn(key='1', shape=(1,), default_value=None, dtype=tf.float32, normalizer_fn=None),
 NumericColumn(key='2', shape=(1,), default_value=None, dtype=tf.float32, normalizer_fn=None)]
完成第 2 步之后,第 3 步是:实例化 Estimator,指定特征列和各种超参数。这里使用 tf.estimator.DNNClassifier,需要传入特征列并定义隐含层神经元数量即目标值标签数量。
classifier = tf.estimator.DNNClassifier(
    # 特征列
    feature_columns=feature_columns,
    # 两个隐含层分别为 30 和 10 个神经元
    hidden_units=[30, 10],
    # 模型最终标签类别为 10
    n_classes=10,
)
WARNING:tensorflow:From /var/folders/tc/9kxpg1x95sl6cm2lc2jwpgt80000gn/T/ipykernel_76374/2381246142.py:1: DNNClassifierV2.__init__ (from tensorflow_estimator.python.estimator.canned.dnn) is deprecated and will be removed in a future version.
Instructions for updating:
Use tf.keras instead.
WARNING:tensorflow:From /Users/huhuhang/miniconda3/lib/python3.10/site-packages/tensorflow_estimator/python/estimator/head/head_utils.py:59: MultiClassHead.__init__ (from tensorflow_estimator.python.estimator.head.multi_class_head) is deprecated and will be removed in a future version.
Instructions for updating:
Use tf.keras instead.
WARNING:tensorflow:From /Users/huhuhang/miniconda3/lib/python3.10/site-packages/tensorflow_estimator/python/estimator/canned/dnn.py:759: Estimator.__init__ (from tensorflow_estimator.python.estimator.estimator) is deprecated and will be removed in a future version.
Instructions for updating:
Use tf.keras instead.
WARNING:tensorflow:From /Users/huhuhang/miniconda3/lib/python3.10/site-packages/tensorflow_estimator/python/estimator/estimator.py:1844: RunConfig.__init__ (from tensorflow_estimator.python.estimator.run_config) is deprecated and will be removed in a future version.
Instructions for updating:
Use tf.keras instead.
INFO:tensorflow:Using default config.
WARNING:tensorflow:Using temporary folder as model directory: /var/folders/tc/9kxpg1x95sl6cm2lc2jwpgt80000gn/T/tmpl7aio9hp
INFO:tensorflow:Using config: {'_model_dir': '/var/folders/tc/9kxpg1x95sl6cm2lc2jwpgt80000gn/T/tmpl7aio9hp', '_tf_random_seed': None, '_save_summary_steps': 100, '_save_checkpoints_steps': None, '_save_checkpoints_secs': 600, '_session_config': allow_soft_placement: true
graph_options {
  rewrite_options {
    meta_optimizer_iterations: ONE
  }
}
, '_keep_checkpoint_max': 5, '_keep_checkpoint_every_n_hours': 10000, '_log_step_count_steps': 100, '_train_distribute': None, '_device_fn': None, '_protocol': None, '_eval_distribute': None, '_experimental_distribute': None, '_experimental_max_worker_delay_secs': None, '_session_creation_timeout_secs': 7200, '_checkpoint_save_graph_def': True, '_service': None, '_cluster_spec': ClusterSpec({}), '_task_type': 'worker', '_task_id': 0, '_global_id_in_cluster': 0, '_master': '', '_evaluation_master': '', '_is_chief': True, '_num_ps_replicas': 0, '_num_worker_replicas': 1}
紧接着,就可以在 Estimator 对象上调用一个或多个方法,传递适当的输入函数作为数据的来源。值得注意的是,这里将 input_fn 调用封装在 lambda 中以获取参数。
steps 参数告知方法在训练多步后停止训练。steps 和先前的 Epoch 不一样,此时相当于取出 steps 个 batch_size 的数据用于训练。而整个训练过程等价于 steps * batch_size / 数据总量 个 Epoch。🔗 所以,通过 steps 换算的 Epoch 可能不是整数,但这并不会影响到训练过程。
classifier.train(
    input_fn=lambda: input_fn(X_train_, y_train_, batch_size=64), steps=2000
)
WARNING:tensorflow:From /Users/huhuhang/miniconda3/lib/python3.10/site-packages/tensorflow_estimator/python/estimator/estimator.py:385: StopAtStepHook.__init__ (from tensorflow.python.training.basic_session_run_hooks) is deprecated and will be removed in a future version.
Instructions for updating:
Use tf.keras instead.
INFO:tensorflow:Calling model_fn.
WARNING:tensorflow:From /Users/huhuhang/miniconda3/lib/python3.10/site-packages/keras/src/optimizers/legacy/adagrad.py:93: calling Constant.__init__ (from tensorflow.python.ops.init_ops) with dtype is deprecated and will be removed in a future version.
Instructions for updating:
Call initializer instance with the dtype argument instead of passing it to the constructor
WARNING:tensorflow:From /Users/huhuhang/miniconda3/lib/python3.10/site-packages/tensorflow_estimator/python/estimator/model_fn.py:250: EstimatorSpec.__new__ (from tensorflow_estimator.python.estimator.model_fn) is deprecated and will be removed in a future version.
Instructions for updating:
Use tf.keras instead.
INFO:tensorflow:Done calling model_fn.
WARNING:tensorflow:From /Users/huhuhang/miniconda3/lib/python3.10/site-packages/tensorflow_estimator/python/estimator/estimator.py:1416: NanTensorHook.__init__ (from tensorflow.python.training.basic_session_run_hooks) is deprecated and will be removed in a future version.
Instructions for updating:
Use tf.keras instead.
WARNING:tensorflow:From /Users/huhuhang/miniconda3/lib/python3.10/site-packages/tensorflow_estimator/python/estimator/estimator.py:1419: LoggingTensorHook.__init__ (from tensorflow.python.training.basic_session_run_hooks) is deprecated and will be removed in a future version.
Instructions for updating:
Use tf.keras instead.
WARNING:tensorflow:From /Users/huhuhang/miniconda3/lib/python3.10/site-packages/tensorflow/python/training/basic_session_run_hooks.py:232: SecondOrStepTimer.__init__ (from tensorflow.python.training.basic_session_run_hooks) is deprecated and will be removed in a future version.
Instructions for updating:
Use tf.keras instead.
WARNING:tensorflow:From /Users/huhuhang/miniconda3/lib/python3.10/site-packages/tensorflow_estimator/python/estimator/estimator.py:1456: CheckpointSaverHook.__init__ (from tensorflow.python.training.basic_session_run_hooks) is deprecated and will be removed in a future version.
Instructions for updating:
Use tf.keras instead.
INFO:tensorflow:Create CheckpointSaverHook.
WARNING:tensorflow:From /Users/huhuhang/miniconda3/lib/python3.10/site-packages/tensorflow/python/training/monitored_session.py:579: StepCounterHook.__init__ (from tensorflow.python.training.basic_session_run_hooks) is deprecated and will be removed in a future version.
Instructions for updating:
Use tf.keras instead.
WARNING:tensorflow:From /Users/huhuhang/miniconda3/lib/python3.10/site-packages/tensorflow/python/training/monitored_session.py:586: SummarySaverHook.__init__ (from tensorflow.python.training.basic_session_run_hooks) is deprecated and will be removed in a future version.
Instructions for updating:
Use tf.keras instead.
INFO:tensorflow:Graph was finalized.
INFO:tensorflow:Running local_init_op.
INFO:tensorflow:Done running local_init_op.
INFO:tensorflow:Calling checkpoint listeners before saving checkpoint 0...
INFO:tensorflow:Saving checkpoints for 0 into /var/folders/tc/9kxpg1x95sl6cm2lc2jwpgt80000gn/T/tmpl7aio9hp/model.ckpt.
INFO:tensorflow:Calling checkpoint listeners after saving checkpoint 0...
WARNING:tensorflow:From /Users/huhuhang/miniconda3/lib/python3.10/site-packages/tensorflow/python/training/monitored_session.py:1455: SessionRunArgs.__new__ (from tensorflow.python.training.session_run_hook) is deprecated and will be removed in a future version.
Instructions for updating:
Use tf.keras instead.
WARNING:tensorflow:From /Users/huhuhang/miniconda3/lib/python3.10/site-packages/tensorflow/python/training/monitored_session.py:1454: SessionRunContext.__init__ (from tensorflow.python.training.session_run_hook) is deprecated and will be removed in a future version.
Instructions for updating:
Use tf.keras instead.
WARNING:tensorflow:From /Users/huhuhang/miniconda3/lib/python3.10/site-packages/tensorflow/python/training/monitored_session.py:1474: SessionRunValues.__new__ (from tensorflow.python.training.session_run_hook) is deprecated and will be removed in a future version.
Instructions for updating:
Use tf.keras instead.
INFO:tensorflow:loss = 19.24567, step = 0
INFO:tensorflow:global_step/sec: 653.907
INFO:tensorflow:loss = 5.731018, step = 100 (0.153 sec)
INFO:tensorflow:global_step/sec: 918.12
INFO:tensorflow:loss = 3.2766824, step = 200 (0.109 sec)
INFO:tensorflow:global_step/sec: 956.444
INFO:tensorflow:loss = 3.0654907, step = 300 (0.105 sec)
INFO:tensorflow:global_step/sec: 1001.7
INFO:tensorflow:loss = 2.758233, step = 400 (0.100 sec)
INFO:tensorflow:global_step/sec: 937.769
INFO:tensorflow:loss = 2.2654872, step = 500 (0.107 sec)
INFO:tensorflow:global_step/sec: 931.896
INFO:tensorflow:loss = 2.1456134, step = 600 (0.107 sec)
INFO:tensorflow:global_step/sec: 999.022
INFO:tensorflow:loss = 2.324047, step = 700 (0.100 sec)
INFO:tensorflow:global_step/sec: 979.788
INFO:tensorflow:loss = 2.1866508, step = 800 (0.102 sec)
INFO:tensorflow:global_step/sec: 1017.6
INFO:tensorflow:loss = 2.284287, step = 900 (0.098 sec)
INFO:tensorflow:global_step/sec: 955.348
INFO:tensorflow:loss = 2.2110753, step = 1000 (0.105 sec)
INFO:tensorflow:global_step/sec: 1002.31
INFO:tensorflow:loss = 2.3068185, step = 1100 (0.100 sec)
INFO:tensorflow:global_step/sec: 1002.2
INFO:tensorflow:loss = 2.0306604, step = 1200 (0.100 sec)
INFO:tensorflow:global_step/sec: 1007.3
INFO:tensorflow:loss = 1.9963558, step = 1300 (0.099 sec)
INFO:tensorflow:global_step/sec: 1009.2
INFO:tensorflow:loss = 2.1134849, step = 1400 (0.099 sec)
INFO:tensorflow:global_step/sec: 1019.92
INFO:tensorflow:loss = 2.19884, step = 1500 (0.098 sec)
INFO:tensorflow:global_step/sec: 997.924
INFO:tensorflow:loss = 1.9835203, step = 1600 (0.100 sec)
INFO:tensorflow:global_step/sec: 1013.38
INFO:tensorflow:loss = 1.9176695, step = 1700 (0.099 sec)
INFO:tensorflow:global_step/sec: 1022.44
INFO:tensorflow:loss = 2.1141558, step = 1800 (0.098 sec)
INFO:tensorflow:global_step/sec: 997.049
INFO:tensorflow:loss = 2.0802722, step = 1900 (0.100 sec)
INFO:tensorflow:Calling checkpoint listeners before saving checkpoint 2000...
INFO:tensorflow:Saving checkpoints for 2000 into /var/folders/tc/9kxpg1x95sl6cm2lc2jwpgt80000gn/T/tmpl7aio9hp/model.ckpt.
INFO:tensorflow:Calling checkpoint listeners after saving checkpoint 2000...
INFO:tensorflow:Loss for final step: 2.214003.
<tensorflow_estimator.python.estimator.canned.dnn.DNNClassifierV2 at 0x2a6228730>
你可以看到上方训练执行的过程,权重会被自动存为检查点 .ckpt 文件。同时,后续的训练过程只有在 loss 更优时,检查点才会被覆盖。这样做的原因在于,后续的模型推理需要重载检查点权重,这样能保证存放的检查点性能状态最优。
下面,我们使用测试数据对模型进行推理评估。此时,我们需要重新定义数据输入函数 evaluate_input_fn,原因在于之前定义的输入函数 input_fn 执行了 repeat() 操作,如果沿用就会导致推理无限持续下去。
def evaluate_input_fn(features, labels, batch_size):
    """评估数据输入函数"""
    # 将数据转换为 Dataset 对象
    dataset = tf.data.Dataset.from_tensor_slices((dict(features), labels))
    # 将仅处理成小批量
    dataset = dataset.batch(batch_size)
    return dataset
最终,使用 evaluate 评估模型,传入数据的过程和训练时相似。Estimator 会自动重载训练保存的检查点,并对测试数据进行推理和评估。
# 评估模型
eval_result = classifier.evaluate(
    input_fn=lambda: evaluate_input_fn(X_test_, y_test_, batch_size=64)
)

print("最终评估准确度:{:.3f}".format(eval_result["accuracy"]))
INFO:tensorflow:Calling model_fn.
INFO:tensorflow:Done calling model_fn.
INFO:tensorflow:Starting evaluation at 2023-11-11T17:30:04
WARNING:tensorflow:From /Users/huhuhang/miniconda3/lib/python3.10/site-packages/tensorflow/python/training/evaluation.py:260: FinalOpsHook.__init__ (from tensorflow.python.training.basic_session_run_hooks) is deprecated and will be removed in a future version.
Instructions for updating:
Use tf.keras instead.
INFO:tensorflow:Graph was finalized.
INFO:tensorflow:Restoring parameters from /var/folders/tc/9kxpg1x95sl6cm2lc2jwpgt80000gn/T/tmpl7aio9hp/model.ckpt-2000
INFO:tensorflow:Running local_init_op.
INFO:tensorflow:Done running local_init_op.
INFO:tensorflow:Inference Time : 0.13310s
INFO:tensorflow:Finished evaluation at 2023-11-11-17:30:04
INFO:tensorflow:Saving dict for global step 2000: accuracy = 0.24444444, average_loss = 2.0582526, global_step = 2000, loss = 2.07397
INFO:tensorflow:Saving 'checkpoint_path' summary for global step 2000: /var/folders/tc/9kxpg1x95sl6cm2lc2jwpgt80000gn/T/tmpl7aio9hp/model.ckpt-2000
最终评估准确度:0.244
最终,我们就可以得到测试结果。除了大量的预创建 Estimator,你也可以根据自己的需要自定义 Estimator,这部分内容可以直接阅读 官方文档相关章节。对于 Estimator,TensorFlow 官方推荐的工作流程如下:🔗
假设存在合适的预创建的 Estimator,使用它构建第一个模型并使用其结果确定基准。
使用此预创建的 Estimator 构建和测试整体管道,包括数据的完整性和可靠性。
如果存在其他合适的预创建的 Estimator,则运行实验来确定哪个预创建的 Estimator 效果最好。
可以通过构建自定义 Estimator 进一步改进模型。
54.8. 神经网络搭建方法小结#
通过几个实验的学习,目前我们掌握了 3 种搭建神经网络的方法:
利用
tf.nn模块提供的各种神经网络组件和函数。利用
tf.keras模块提供的各种高阶神经网络层。利用
tf.estimator提供的高阶预创建或自定义封装模型。
大多情况下,使用这三种方法都可以实现我们的想法。不过,这里有一些使用经验供参考。
如果需要实现的网络自定义程度较高,有很多自己的想法且并没有合适的高阶 API 层供调用,那么首选肯定是 tf.nn。tf.nn 功能强大,但你需要自行定义训练迭代过程,且大多数过程都需要利用 TensorFlow 一系列低阶 API 完成。tf.keras 模块主要面向于实现包含标准化层的神经网络,例如后面会学习的经典卷积神经网络结构等。API 使用方便,简洁明了。
tf.estimator 本身在 tf.keras 之上构建而成,Keras 模型也可以通过创建 Estimator 进行训练 🔗。Estimator 简化了在模型开发者之间共享实现的过程,其可以在本地主机上或分布式多服务器环境中运行基于 Estimator 的模型,而无需更改模型。但 Estimator 的使用可能需要对 TensorFlow 足够熟悉之后才能得心应手。
54.9. 总结#
本次实验重点了解了 TensorFlow 种的 Keras 和 Estimator 的使用,并结合我们前面的例子进行了模型重写。Keras 是非常常用的 API,后续实验中会广泛应用,而 Estimator 和 Keras 直接又有着千丝万缕的联系。随着我们面对的模型复杂程度上升,高阶 API 的优势也会进一步显现。
相关链接
如果你觉得这些内容对你有帮助,可以通过 微信赞赏码 或者 Buy Me a Coffee 请我喝杯咖啡。